giovedì 13 agosto 2015

Renault AHS - Jugoslavia, inverno 1944 - AL.BY 1/72 / Renault AHS -Jugoslavia, winter 1944 - AL.BY 1/72

Renault AHS , Alby 1/72


Il Renault AHS è un camion leggero francese da 2 tonn. prodotto per l'esercito tedesco dal 1941 al 1944.
Questa variante fu molto utilizzata nel settore sud-orientale dell'Europa: Jugoslavia, Italia, Grecia.

Il modello:
Il modello è stampato in resina in maniera eccellente, i pezzi sono limitati ed è facile rimuovere gli estrattori. 
Ho confrontato i pezzi ed il modello a montaggio finito e la somiglianza con il veicolo reale è notevole; non sono abituato a contare i rivetti o misurare ogni pezzo, mi accontento che alla fine il modello sia molto simile al veicolo reale: l'effetto scala non si può eliminare, specie in pezzi così piccoli. 
Le uniche aggiunte apportate al modello sono i due tergicristalli e lo specchietto laterale, realizzati in filo di rame e plastica per maggiore solidità. 

La colorazione:
Dopo aver lavato il modello in acqua e sapone e dopo averlo spruzzato con Primer Citadel Nero, il modello è stato colorato e invecchiato con la mia consueta tecnica,totalmente in giallo sabbia. 
Qui puoi trovare la descrizione della tecnica :


Con bianco acrilico, diluito con acqua in varie proporzioni, ho poi provveduto a simulare una mimetica invernale campale, dipinta a pennello: un pennello 10/0 ha facilitato il lavoro. 
Per realizzare la mimetica ho consultato alcune foto di mezzi reali trovate su Internet.
Il fango è stato realizzato con la pasta "terreno pronto" 
Qui trovi il link per poterla realizzare:


Il carico:
Il carico è composto da pezzi di legno, che ho realizzato con uno stuzzicadenti tagliato in due e sezionato in vari pezzetti; ho colorato la parte esterna (corteccia) in marrone scuro, mentre per  la parte interna ho semplicemente dato un leggero lavaggio di marrone chiarissimo ad olio. 
I sacchi e i teli sono realizzati con stucco bicomponente Tamiya. 


Renault AHS, Alby 1/72

Renault AHS is a light French truck (2 ton. load) built for German Army in 1941-1944.
This version is often utilised in south-east of Europe theather: Jugoslavia, Italy, Greece.

The model:

The kit is superbly casted in resin, not a great number of pieces.
Resin sprues are easily removable.
I check the pieces and the built model with historic images and is very similar to the real vehicle.
I dont like so much to measure every piece and to count rivets: the scale effect is nearly impossible to bypass in these little models.
 Side mirrors and windshield wiper are realized in brass wire and plastic for give more resistance to the pieces. 

The paint:
 After a wash with water and soap, I spray the model with Citadel Black primer.
The painting process is the same for all my models, you can find the guide here: 


In this case, the Renault is entirely painted and weathered in 
German sand yellow.
With a diluted acrylic white paint I start to draw the whitewashed, brush-made camouflage:
A 10/0 brush is very useful.
I suggest to search in Internet some historic photos to have a good result.
The mud is realized with the "ready terrain paste"; here you can find the guide to make it:


The load:
The truck load is made with cutted toothpicks: they are cut in half and reduced in little pieces. 
The exterior (Bark) is painted with a very dark brown, the interior is only  washed with a very diluted light oil sand brown.
The coal bag and tarpaulin are made with Tamiya epoxy putty. 


Il fango realizzato con la "pasta terreno pronto" / the mud, realized with "ready terrain paste". 


Il carico / the truck load


Ciao Simone

mercoledì 29 luglio 2015

Realizzare foglie in scala 1/72 / Guide to realize realistic leaves in1/72 scale

Realizzare foglie in scala 1/72. 

Necessario: 

Stuzzicadenti o profilati plastici
Taglierino affilato
Pezzo di gomma
Foglie secche


Per realizzare questo sistema mi sono ispirato ad un set simile realizzato in scala 1/35 con dei chiodi sagomati.

Le foglie in scala 1/72 sono un bel particolare da aggiungere a Diorami autunnali o invernali ma quelle in commercio hanno un costo proibitivo, oltre che essere veramente poche per confezione.

Per realizzare questo set si parte realizzando i punzoni: intagliando gli stuzzicadenti o i profilati in plastica si realizzano le forme delle foglie, ovviamente stilizzate;

Appoggiando la foglia secca sul pezzo di gomma e spingendo col punzone, si ottiene la foglia della forma desiderata.

Il sistema è semplicissimo e si possono ottenere foglie di tutti i tipi e di ogni colore.

Le foglie si attaccano con colla vinilica e, per rafforzarne la tenuta e la resistenza, le coloro con un lavaggio di colore ad olio giallo, marrone o rossiccio. 


Guide to realize realistic leaves in 1/72 scale.

Necessary:
 
Toothpicks or Evergreen plastic profilate
Sharp cutter
Rubber piece or a rubber eraser
Dried leaves


In order to realize this system I take inspiration to a similar set realized in 1/35 scale with engraved nails. 

Small-sized leaves in 1/72 scale are a beautiful detail to add to autumnal or winter Dioramas but commercial leaves are expensive and need too many blister to have a good terrain cover.

Sand and cut the toothpicks or the plastic  to engrave the style of your leaves, obviously stylized;

Put the dried leaf over the piece of rubber and punch with the engraved tootpick. 

The system is very simple and you can obtain many leaves and many type as you want.  

I fix the leaves with vynilic glue; 
in order to "strengthen" the leaves, a very diluted wash is useful (I use sand, yellow, light green , brick red oil colors).

Foglie secche / Dried leaves


Stuzzicadenti incisi / Engraved tootpicks


Come si ottengono le foglie / how to make leaves


Le foglie / The leaves


Le foglie utilizzate su dei modelli / Leaves glued on models


Ciao Simone


mercoledì 8 luglio 2015

Realizzare una pasta "terreno pronto" in maniera economica / Realizing a low cost "ready terrain" paste.

Realizzare un composto "terreno pronto" in maniera economica

Materiale:

Stucco tipo "francese" bianco
Acqua
Sabbia
Sassolini tipo "ballast" ferroviario
Erba sintetica
Vinavil
Pigmenti colorati

Allo stucco aggiungere acqua (poco per volta),  vinavil (un cucchiaio)  il "Ballast", la sabbia, poca erba sintetica ed il pigmento (o i pigmenti) e mescolare fino a quando il composto diventa di colore uniforme e con la consistenza dello "yogurt".
Per rafforzare il colore si può aggiungere inoltre del colore acrilico marrone o del colore che si preferisce.

Il composto per realizzare la base del terreno e' pronto: si stende con l'aiuto di una spatola e si modella sulla base (io uso polistirolo) con l'aiuto di un pennello.

Una volta finito di usare, ricoprire con un leggero strato di acqua il composto per mantenerlo umido e pronto all'uso.

Il composto si presta per realizzare terreni, fango, texture diverse, a seconda del grado di diluizione. 


Realizing a low cost  ready terrain" paste.


Materials:


White filler/putty French type (I use Polyfilla");
Water;
Sand;
railway type sand "ballast”;
synthetic grass;
Vinylic glue;
Pigments;
Acrylic colours.


Add sand, "Ballast", synthetic grass and the pigment in the filler: mantain the compound "soft" (like a yogurt) with little insertion of water; the color must be plain. 
Finally, add a few of vinylic glue and mix up.
If you want to "reinforce" the color of the compound, you can add some acrylic paint in the mixture.


The paste is ready: I apply it with a spatula on the base 

(I  use polystyrene); with the aid of a paintbrush I realize textures and details. 

The paste must be humidified with a layer of water in the surface: use the filler air-proof can.

The compound is perfect in order to realize terrain, mud, various textures: you can change the  dilution of the mixture simply adding a few of water. 


Materiale necessario ;
 required materials ;


Consistenza della pasta e uniformità del colore 
 Paste consistency and color uniformity ;


Utilizzo con spatola 
drawing up with spatula;


Creazione della texture con pennello 
 Realizing textures with paintbrush;


Il risultato finale 
 Final result.


Ciao Simone

domenica 21 giugno 2015

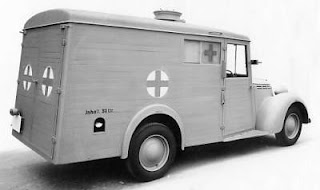
Fiat 1100 Ambulanza "Einheits" - Fiat 1100 Ambulance "Einheits" - ITALIANKITS


Fiat 1100 ambulanza "Einheits". Esercito Tedesco, Italia, 1944;


Modello in scala 1/72, realizzato in resina, Italiankits.

Ambulanza allestita su telaio Fiat 1100 da Viberti, su commissione delle Forze Armate Tedesche di occupazione.
Il mezzo era realizzato completamente in legno e cartone pressato, per risparmiare metallo, ad eccezione del cofano motore e del telaio. 
Per i feriti erano disponibili due lettighe e due posti a sedere. 

Il modello, in scala 1/72, e' realizzato in resina da Italiankits ed e' composto da pochi pezzi ottimamente stampati. 
Il lavoro di assemblaggio e' ridotto al minimo, costruire questo modello e' veloce e piacevole.
Il lavoro piu' noioso e' staccare i pezzi dai supporti (comunque discreti).
L'unico aggiustamento effettuato e' stato quello di limare il cofano per farlo combaciare perfettamente alla carrozzeria. 
E' possibile lasciare tutte le portiere aperte ed anche il cofano motore, in quanto e' rappresentato un motore semplificato all'interno.
Io ho costruito il modello da scatola, ma alcune modifiche sono comunque possibili, come la sostituzione dei maniglioni sulle portiere del vano di guida e i supporti delle barelle, con sprue filato o filo di rame. 
Con del comune acetato si riproducono i vetri; nel caso dei vetri "opacizzati" si possono riprodurre carteggiando in maniera leggera il retro di un foglio di acetato. 
I vetri sono incollati con una miscela di vinavil e acqua. 
I piccoli accessori inseriti nell'ambulanza sono realizzati con plasticard e listelli Evergreen.
La colorazione e' , come mio solito, realizzata ad olio ed Humbrol su base acrilica Tamiya. 
Ecco il link su come procedo alla colorazione:


Fiat 1100 ambulance Einheits. German Army, Italy, 1944;


1/72 scale model,  resin, from Italian kits


Military Ambulance built on Fiat 1100 chassis from  Viberti, in use only with the German occupation Forces.
The vehicle  were completely realized in wood and pressed cardboard,in order to save metal:  only the motor cover 
and the frame/chassis were in metal. 
Inside the rear van there are  two stretchers and two places  available to sit wounded.  

The 1/72 model is realized in resin from Italiankits and is composed by  few  pieces very well casted. The assemblage job is very fast and plaesant. 

The more boring job is to cut the pieces from the resin sprues (however discreet).

The only work that need a little of attention is to fit (with a little file) the engine cover on the van body. 

It is possible to leave all the door opened and also  the motor cover ( a simplified motor is moulded inside).

The model is built out from the box, but some  modifications are possible, like  the substitution of the handles on the roof and the stretchers supports. 

The glasses are reproduced with acetate; opacified glasses can be reproduced sanding lightly the rear side of the acetate foil.  Glasses  are glued with a mix of vinavil and water.

Little accessoires like boxes, cans and other are in scratch with Evergreen profilate. 

The paint is realized with oil colours and  Humbrol on Tamiya acrylic base, as usual for me.  Here the link to my painting technique. 


Ulteriori informazioni sul modello:
For further information:


Alcune immagini del veicolo reale:
Some real vehicle images:


Alcune immagini del modello:
Some model images:


Modello finito:
Completed model:


Ciao , Simone